Adam Savage releases 3D starship model for Starfield fans to print and build at home
One of Starfield’s defining traits is its creativity, whether it’s customizing characters, bases or spaceships, Bethesda’s Fans have been inspired to create by the latest sandbox-style RPG. Fans have created a lot of fan-made Starfield creations have already circulated across the internet but one of the most impressive is Adam Savage’s model of the title ship. The files are now available for download for those who want to build or print.
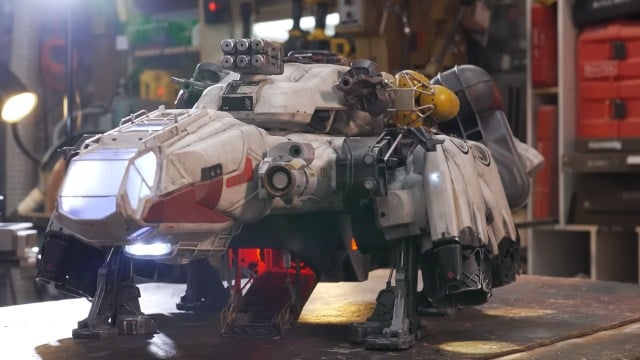
A three-foot recreation of the most iconic ship in the game, The Frontier, was modeled during an episode of Adam Savage’s Tested, and the fans wanted to make this for themselves. Luckily, Savage has teamed up with Bethesda once again to make that dream a reality as 3D printable files have just been released for free on Bethesda’s website.
While some may be disappointed that this isn’t the three-foot behemoth presented in the original video, this 12-inch model keeps the impressive level of detail seen in the prior build. The build is a 12-inch model that maintains the same level of detail as seen in the previous video. Tested model, made by Sean Charlesworth, is currently the most accurate representation of the ship aside from Bethesda’s own work.
A guide to building Adam Savage’s Frontier model from Starfield
Before you begin
Like in Starfield. Frontier model It is a good idea to use a bilingual translator Split into modular parts You can also use this to help with the printing. It does, however, add an additional level of difficulty to the construction process, which can be difficult for beginners. Printed models only come in single-color resins so you’ll also need to Paint the ship yourself.
If you’ve never done this process before, it might be worth starting with something smaller as this package contains 40 parts. You can also take the.stl file to a professional to have them printed for a fee.
Below you’ll find the full step-by-step guide from Tested, but we’ve summarised the important points for you below.
Printing
The first 16 minute of the video above explains how Charlesworth built the model using 3D modeling software. Luckily you won’t need to follow this portion of the video—though you will need a bit of familiarity with 3D printing programs if you want to print it out yourself.
If you’re confident in 3D printing, the rest of the video guide is worth watching alongside the STARFIELD FRONTIER Print & Assembly Guide v1.pdf included in the zip folder on Bethesda’s website. The first part of this video is a supplementary guide to help you follow the instructions.
Building
Assembly begins at the 25-minute mark. This can be followed by watching the video. Super glue You can also find out more about the following: Adhesive bondingKickers are used to join the pieces. Each part needs to be aligned in the correct way in order for the ship to look correct—luckily there are shape-coordinated holes on the pieces to help.
Painting and extras
For advanced modelers, they can add LED lights on the back to simulate the fire from the thrusters. They can also add clear resin for realistic tinted glass and thin metal rods in the Grav Drives to add a level of detail. Even more detail can be added if you’re skilled at figure painting, advice on painting can be found in a Q&A by the Tested Team below
Author